This past weekend I taught a class and had a booth at ETA California. This is a sewing conference organized by Peggy Sagers. The first ETA was in California 8 years ago after the Sewing Education Conference in Long Beach folded. ETA = Education in Textile Arts and is devoted to textile education. Peggy now has ETAs in Dallas, Washington DC, New York, and Chicago. I also taught at the Dallas ETA last year. That was really fun and the ladies were a hoot.
Unfortunately, I didn't take any photos of my classes or the event this year. The conference consists of a vendor hall and has over 50 classes. The core group of instructors are: Jan Bones (she has great lingerie patterns); Lyla Messinger (great classes on knits, patterns, and owner of The Sewing Place); and Emma Seabrooke (another great instructor on various techniques). I did a class on half slips and had a great time and hope to be asked back again next year.
The vendor hall has about 15 booths that include fabric, jewelry, patterns, notions, patterns, and sewing tools. The price for the conference is very reasonable and usually includes the hotel room. If you have an ETA in your area, I strongly recommend going and checking it out. My booth was next to Kandi Christian who teaches heirloom sewing and machine embroidery and has written many articles for various sewing magazines. During class times the vendor hall is quiet, so she and had got to know each other. They also had Margot Silk Forrest and Destiny Carter authors of "Sassy Feet". they had some really fun classes on how to transform your shoes and purses using paints and embellishments. The conference has a wide variety of classes.
Here's a link to the brochure
Thursday, October 24, 2013
Monday, October 7, 2013
T-Shirt Marathon
After the wedding gown and Chanel inspired jacket, I needed something simple to sew. I also noted a "hole" in my wardrobe this summer in the lack of t-shirts to go with jeans and/or shorts. I am now working part time (3 days a week) and spend more time in casual clothing then work clothing. (By the way, 3 days a week is perfect and I love my new schedule.)
I pulled together some 1 yard cuts of fabric and bought a few online and sewed up 6 t-shirts. I think the thread changes on my serger and coverlock was the most time consuming portion.
 The Jalie 2805 and Simplicity 4076 (gathered cf neckline) are almost identical. The Jalie has the tulip sleeve and the fit is a little more generous. Because I only had a yard of each fabric (except the pink), I was limited on the details for Vogue 8879 and not able to add the sleeve details which I do like and will most likely make again with the details. I will not add the open back feature. I now have some fun new tee's to wear with jeans this fall.
The black and grey striped is from Stone Mountain and is a sweater knit; the pink is a rayon knit from FIDM for $1 a yard; a couple are from The Sewing Workshop and are still available. I love prints with letters and this fabric is so soft and washed really nicely; this gold and white striped fabric is a great weight and I'm tempted to buy more.
 I'm not sure if I like it or maybe I'm just tired of looking at it. But I'm so glad it is done. Here are some details.


 I'm not crazy about the trim either but could not find what I had envisioned so I used grosgrain ribbon and a trim. I will most likely wear this jacket with jeans.

I pulled together some 1 yard cuts of fabric and bought a few online and sewed up 6 t-shirts. I think the thread changes on my serger and coverlock was the most time consuming portion.

The black and grey striped is from Stone Mountain and is a sweater knit; the pink is a rayon knit from FIDM for $1 a yard; a couple are from The Sewing Workshop and are still available. I love prints with letters and this fabric is so soft and washed really nicely; this gold and white striped fabric is a great weight and I'm tempted to buy more.
Oh, and I finished my Chanel inspired jacket.

The buttons I purchased from Susan Khalje.


chain at hem; hook front closure; quilting details
Thursday, September 5, 2013
Sewing and Altering
Last summer I made McCalls 6559
 which fit me for about a week. After that, I gave it my niece to wear. This summer she returned it - she was "over stripes". I looked at it and thought, all it needs is about 4 extra inches in the side seam for it to fit me without standing straight and sucking it in - which you know only happens for about 3 seconds in front of a mirror. So I cut off the bottom to make it shorter and inserted a godet in one sideseam with the fabric that I eliminated. I now have a new summer dress to wear to Kauai in a few weeks. You can see the godet on the right side of the photo. (For some reason I was having static issues at the hem.) Here's the front and back view.


My sewing has been a bit slow the past couple of weeks. My mom fell and broke her hip, so I've been going back and forth to the hospital everyday to cheer her on in her rehab and to just make sure she is being taken care of. (Only after her blood pressure kept going up, did I realize they were not giving her her blood pressure meds (I gave them her prescription list of meds when she was admitted - didn't think I needed to check their list), and then it took 2 days to get the doc to put it back on their list, but that's another rant.) My mom gets to go home saturday where I will spend another couple of days with her and my dad to get her situated and comfortable walking with her temporary walker at home). I think I will bring some fabric and patterns to cut out while I'm there.
I also managed to make the Sewing Workshop's West End Top which I think is more like a jacket/hoodie.
I used a ponte knit which seems to be perfect for this jacket. The front of the jacket is unfinished which I am not crazy about.
 The band goes to the forward side seams and the hem on the front is unfinished. I continued the top stitching through this unfinished area to the zip. (I see I have a thread to trim.)
But I do think it is a cute jacket/hoodie that is very loose fitting.

 The Sewing Workshop patterns have some nice instructions. I made a S/M.
My sewing has been a bit slow the past couple of weeks. My mom fell and broke her hip, so I've been going back and forth to the hospital everyday to cheer her on in her rehab and to just make sure she is being taken care of. (Only after her blood pressure kept going up, did I realize they were not giving her her blood pressure meds (I gave them her prescription list of meds when she was admitted - didn't think I needed to check their list), and then it took 2 days to get the doc to put it back on their list, but that's another rant.) My mom gets to go home saturday where I will spend another couple of days with her and my dad to get her situated and comfortable walking with her temporary walker at home). I think I will bring some fabric and patterns to cut out while I'm there.
I also managed to make the Sewing Workshop's West End Top which I think is more like a jacket/hoodie.
I used a ponte knit which seems to be perfect for this jacket. The front of the jacket is unfinished which I am not crazy about.
But I do think it is a cute jacket/hoodie that is very loose fitting.
Thursday, August 29, 2013
French Jacket with Susan Khalje - Day 1
Earlier this month, I took a 5 day couture sewing class with Susan Khalje. I wanted to make a Chanel style jacket. There were 12 students in the class and it was hosted at an ASG member's home. (Yes, she had a very large nice home that fit all 12 students and their supplies nicely.) I showed up on time with my muslin prepared and ready work very hard and learn all I could.
 The pattern I chose was Vogue 8804 because I liked the 3/4 sleeves and short length. I was going to omit the buttons and overlap and use centerfront coat hook closures. I quickly learned that it might be difficult (some said impossible) to make a Chanel jacket in 5 days and was discouraged and told I should make a regular jacket (with organza underlining). I wanted to learn how to make a Chanel jacket and was willing to go back to the hotel each night and work until midnight if I had. Then I learned that my pattern choice was not optimal due to the back darts and the grain of the sleeves. It was suggested I use Vogue 7975.
 This meant I had to make an entirely new muslin and all I could think about is losing one of my 5 days working on a muslin. One of the other students loaned me her Vogue 7975 and another loaned me some muslin, and I quickly put together another muslin while Susan was fitting the muslins of the other students. (I don't have any photos of the new muslin because as you can imagine I was frantically working trying to get caught up.) I managed to get my new muslin done that morning, fitted that afternoon, stitch lines redrawn thread traced and ready to cut out my fashion fabric. Fortunately most of my fitting issues are pretty easy: taking in the bust, letting out in the hips, expanding the bicep of the sleeve, and some lengthening here and there. By the end of the day I was ready to cut my fashion fabric which I purchased about a year ago from Fabric Mart Fabrics. I managed to pin my pattern pieces to my fabric before the class ended on day 1. You can see my fabric on the floor in the hotel ready for cutting.

I had to match the plaids and line up the pattern pieces so that everything matched after sewn. I will cut the three piece sleeves out later because those needed matching and the plaid lines might change after a few more fittings. The main jacket pieces were roughly cut out using 2" seam allowances.
 That evening I basted every stitch line. Each line/side basted is a separate piece of thread.
 And also basted on the stitch line some silk organza to the shoulder/sleeve area of the 4 side jacket pieces. Susan said it was not necessary to do the entire armseye, just the upper portion.
 The next day I was going to baste the jacket together for another fitting.


I had to match the plaids and line up the pattern pieces so that everything matched after sewn. I will cut the three piece sleeves out later because those needed matching and the plaid lines might change after a few more fittings. The main jacket pieces were roughly cut out using 2" seam allowances.


Crafting
While I search for trim for my Chanel/French Jacket I decided to take a break from garments and make a sewing machine cover. Inside the Fall issue of Stitch magazine there is a really cute sewing machine cover. I found the fabric as shown at a local-ish store in Laguna, California called Sewing Party. The cover has a cute patchwork spool of thread and some really cute sewing related fabric. It was fairly easy to sew up in a few hours (I had to read and re-read instructions a few times to figure out what they were talking about and still not sure I got it right, but it does look the same.) The cover is quilted with some simple lines and lined with white cotton muslin.


Can you see the "spool"?
I got some trim samples from Britex but am not excited about any of them. I've been scouring the internet looking for trim. If you have any suggestions on where to get trim for a Chanel/French style jacket let me know. I'm looking for something off white with maybe a little black and coffee colors.
Thursday, August 22, 2013
Where Has the Summer Gone.... Has it really been 3 months?
I cannot believe I haven't posted anything for almost 3 months! I think after the wedding dress I took a break and that break turned into 3 months. I have so much to catch up on.
First, the wedding gown, finished and the happy bride and groom. The dress was a success. It fit beautifully, stayed on and in place, and my niece looked beautiful. I did a full review of the dress PatternReview

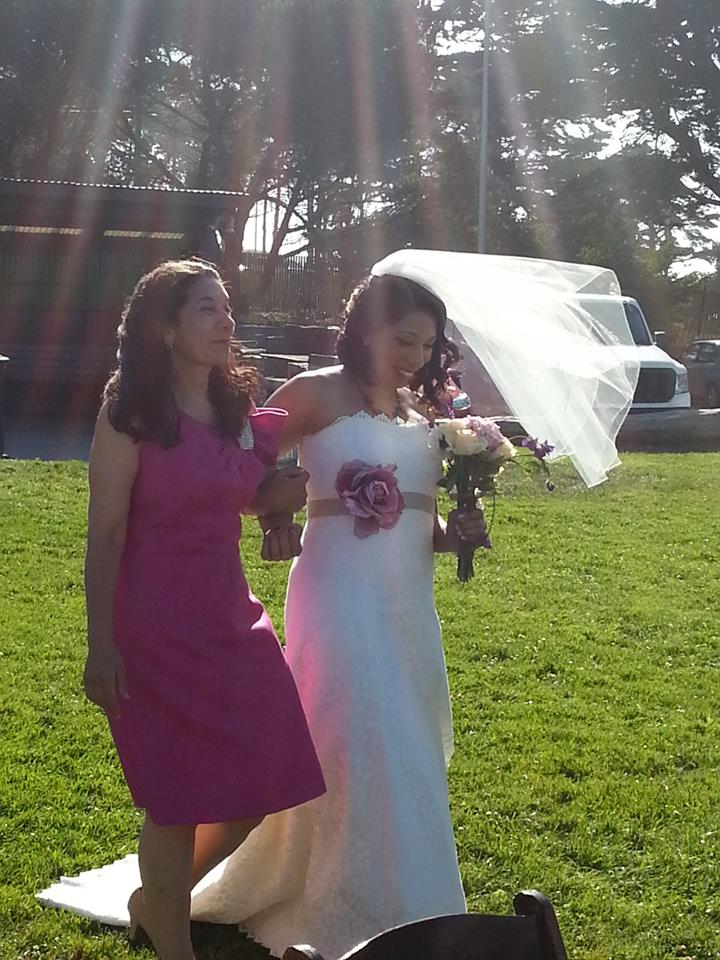
Here's the mother of the bride (sorry for the poor quality, and it was a windy day). The wedding ceremony was at the Presidio overlooking San Francisco Bay.
 Both dresses were a challenge to work on. I am very happy with they way they turned out.


 So you can see, I've still been sewing and churning out garments. I just recently returned from a 5 day Susan Khalje Couture class. My project was the Chanel/French jacket. ooo-la-la. I am now searching for the perfect trim. I took photos of the construction process and will be posting soon with lots of photos.. promise!
First, the wedding gown, finished and the happy bride and groom. The dress was a success. It fit beautifully, stayed on and in place, and my niece looked beautiful. I did a full review of the dress PatternReview

Here's the mother of the bride (sorry for the poor quality, and it was a windy day). The wedding ceremony was at the Presidio overlooking San Francisco Bay.
The following is a photo summary of what I've been working on these past couple of months


Wednesday, May 29, 2013
Huntington Library and Gardens, Pasadena, California
Warning: this is not sewing related......
I work in Pasadena at Caltech as does one of my sisters (I have three). About once a week, during our lunch hour, she and I go over to Huntington Library and Gardens to wander around . We like looking at the gardens and just being outside, however, today it was hot (and I was hungry and cranky and didn't really want to wander too much) so we went inside some of the gorgeous buildings to see some of the exhibits. Here's some photos


I work in Pasadena at Caltech as does one of my sisters (I have three). About once a week, during our lunch hour, she and I go over to Huntington Library and Gardens to wander around . We like looking at the gardens and just being outside, however, today it was hot (and I was hungry and cranky and didn't really want to wander too much) so we went inside some of the gorgeous buildings to see some of the exhibits. Here's some photos


I thought these light bulbs were interesting


A view out one of the gallery windows

My sister and I
Friday, May 10, 2013
Mother of the Bride Dress Done
The Mother of the Bride dress is done! (well, except for the hook and eye at the top of the back zip).
Pattern Sizing: Sizes 42, 44, 46, and 48. I made size 46 which equates to about a size 8 in RTW "hips" and 14 in RTW "bust".
Did it look like the photo/drawing on the pattern envelope once you were done sewing with it? Yes. Yipee!
Were the instructions easy to follow? Instructions? There were no instructions. Only pattern. But the pattern was wonderful and the pieces fit perfectly. The entire process of this dress was 2 steps forward 1 step backwards. I'd do something, then realize I needed to do something else first, so had to rip out and re-do. For instance, I sewed the lining in before the zip and realized I needed to add the zip, at least before I sewed the lining to the neckline. It really helps to think about several steps at a time and how they all will fit together.

I first made a muslin and fitted it. I had to take a lot of fabric out of the bust as there was enough fabric for someone with at least a C cup. She was a large A/small B. I did this with 2 "dead" darts which are darts in the pattern, but not on the finished dress

Below is the original pattern

Some pleats and gathers had to be omitted when I removed fabric with the "dead" darts.

What did you particularly like or dislike about the pattern? I loved that it is a narrow sheath dress, the one shoulder, and the bling option. I originally looked at this pattern for myself, but then thought, how nice the mother of the bride would look in this walking her daughter down the aisle. This dress will not overwhelm the bride's dress, but my sister in law will be stunning on her own too. They will compliment each other.
The most difficult part of the dress was the draped shoulder. (And I thought that would be easy) Trying to figure out what was needed with only the picture and a couple of square shaped pattern pieces. I decided not to underline or line the drape so that it would fall nicely. There was also a piece that I assumed was for the back which the front part of the upper shoulder drape was to fit to. Here's an inside bodice view.

I did a lot of hand sewing on this dress and the drape and bodice to get it and the pleats just right. You can see some of my traced markings where I had to let the muslin out a bit. For this reason try to use tracing paper that is close to the color of your fabric, but still visible. However, on the bridal gown I used white on white... which was only visible at a certain angle, but that's another story.
That reminds me, I did have to raise the armholes about 1" as they were low.
I put the zipper in by hand. I thought about a side zip versus a back zip and went with the back because I felt there was already too much going on on the sides. After basting in the zip I used a small back stitch/pick stitch with double waxed thread to sew in the center zip. I still need to put a hook and eye at the top. Because of the angle of the back, there was no way to get the zip all the way to the top.


Fabric Used: I used silk jacquard for outer fabric; silk organza underlining, and china silk for the lining. I used the selvedge edge of the organza to stay the neckline.
Would you sew it again? Would you recommend it to others? I love this dress and would love to have an opportunity to make it for myself. If you fairly advanced this is a great dress. The dress itself is not too difficult and fairly basic, but the no instructions I feel makes it advance.
Conclusion: I am so happy with the way this dress turned out.


Monday, May 6, 2013
Simplicity 1651

My dress to my niece's wedding is DONE!
My review and all the details can be found here PatternReview
Thursday, April 25, 2013


Thursday, April 18, 2013
Youth Sewing IS Hip
Here's a nice blog entry of the January Teen Class I taught at Road to California.
This sunday my "regular" ASG - LA teens and I are meeting and we are going to make a t-shirt. The girls have asked to do sleeves and knit. I don't want to tell them that both can be difficult because I learned, what they don't know.. is better! I'll take photos and post next week. This will be our first regular meeting this year as the previous have all been "camps" at various sewing and quilting events. It will be nice to have the smaller group of about 4-6 girls. They are all so talented and fearless. This year I'm going to concentrate on techniques and give them more instructions instead of just trying to get a project completed. I want them to end this year with a good sewing base so sewing on their own will be easier.
I've also been working on my Sew Easy Knits website. It was transferred over to me and we ended up losing the content and pages, so I've been trying to rebuild it AND learn how to use Yahoo. I think I got it "good enough for now", but really do want to revamp it a lot more.
In July, I'll start working part time! Yea! I'm really excited because this means I will have more sewing and fun time! It's a sort of semi-retirement before I actually do retire. I'm thinking of expanding my teen sewing to weekly, but think I should take the summer and enjoy my half-time before I fill up my days. And I got some cleaning and re-organizing to do.
My sewing goal this weekend is to finish the mother of the bride and flower girl dresses!
Friday, April 12, 2013
Wedding Attire Progress
The wedding gown is essentially done! I really wish I could share it with you... but, I can't. I also almost finished the flower girl dress, and sadly I cannot share that either since I used the same fabric as the wedding gown. (I promise to share pictures of everything as soon after the wedding!) BUT, I did make good progress to the outside of the mother-of-the-bride dress, and I can share it with you. This is a close up of the bodice. I need to add the lining and attach the "sleeve" on your right. Marfy has no instructions, so I'm just guessing, and playing, and looking, and rearranging, but I think this is it.
 I love the fabric and I love the dress! I want to make this dress for me! There will be some sort of bling on the ruched/gather square. Either a broche or some sort of bedazzling.
 Here's a full view. I love the seams in the front. I bought some ivory china silk for the lining, but I think I need something closer to the color of the dress. I think it will be too difficult to make it perfect so no lining peaks out and to make it easier on myself, I'm going to get some lining that closely matches.
Now, for MY dress. I like this pattern and the version with the twisted peep hole. I got two fabrics.

 and I've cut out the top one which is a silk charmeuse and have basted silk organza underlining, but the bottom one is still calling me. (It looks l ike a water color painting) The bottom fabric is a sheer silk that I will underling with a lime green so that the yellow and green pop. I may make the dress from both (I still have 5 weeks) and then choose one. Which one do you like?
I have signed up for a weekend fitting class with Judy Kessinger through the local ASG. So tomorrow morning I'll be out of the house early to take an 8AM class on tees, and then sunday on pants. I'll take lots of photos.
Happy Sewing.. have a great weekend!


Now, for MY dress. I like this pattern and the version with the twisted peep hole. I got two fabrics.


I have signed up for a weekend fitting class with Judy Kessinger through the local ASG. So tomorrow morning I'll be out of the house early to take an 8AM class on tees, and then sunday on pants. I'll take lots of photos.
Happy Sewing.. have a great weekend!
Thursday, March 28, 2013
Mother of the Bride and Flower Girl Progress
I have completed and fitted the muslin for the mother of the bride.

A few comments: Marfy patterns are beautifully drafted. The pattern came in a folded piece of paper with a label, no instructions, and no seam allowances. The pattern has alphabetical match points and a few other notations, but that's it.
First I made my muslin:
laying the pattern on the muslin fabric, and then with waxed tracing paper traced all the stitch lines, grain lines, notches, darts, pleats, center front, center back.
With a permanent marker I marked each piece, top, bottom, arrows, the alphabetical match points, what piece it was, who it is for, and size.
I thread traced each seam, grain line, and dart.
My seam allowance was about 2" because I wasn't sure how close the size I got would match up to my sister in law.
then I based all seams together, matching all the alphabetical points, guessing here and there, and it all worked out. Every seam and point matched up perfectly and it came together nicely.
 It will look much better in a softer fabric. I let out the side and back seams a bit, she tried it on, and it fit pretty good. I had to put in a few dead darts where there was extra fabric in the bodice. I took it apart, made my dead darts, trued up the seams and the grain lines, and it's ready for the fashion fabric. We will be meeting on saturday at International Silks and Woolens to look for fabric.
When making your muslin, be sure to extend your grain lines to the seam edge. That way, if you make changes and have to true up the lines, it's easier and more accurate with the longer grain line.
Next on the to-do list is the flower girl dress. I chose this Vogue pattern because I like the little cap sleeves
The dress will be knee length since she's only 2 and I think it will look better being shorter (a two year old needs a twirly dress!) I will be using the same fabric as the wedding gown.

Since kid pattern sizing runs large, I made a muslin of the bodice which I will fit this weekend.
 I made it the same as the others except I didn't tread trace the seams and I used a little wider 3/8" instead of 1/4" elastic in the sleeves because that is what I had. But I will use narrower in the final dress.

First I made my muslin:
laying the pattern on the muslin fabric, and then with waxed tracing paper traced all the stitch lines, grain lines, notches, darts, pleats, center front, center back.
With a permanent marker I marked each piece, top, bottom, arrows, the alphabetical match points, what piece it was, who it is for, and size.
I thread traced each seam, grain line, and dart.
My seam allowance was about 2" because I wasn't sure how close the size I got would match up to my sister in law.
then I based all seams together, matching all the alphabetical points, guessing here and there, and it all worked out. Every seam and point matched up perfectly and it came together nicely.

When making your muslin, be sure to extend your grain lines to the seam edge. That way, if you make changes and have to true up the lines, it's easier and more accurate with the longer grain line.
Next on the to-do list is the flower girl dress. I chose this Vogue pattern because I like the little cap sleeves
The dress will be knee length since she's only 2 and I think it will look better being shorter (a two year old needs a twirly dress!) I will be using the same fabric as the wedding gown.

Since kid pattern sizing runs large, I made a muslin of the bodice which I will fit this weekend.

Subscribe to:
Posts (Atom)