Wednesday, May 29, 2013

Huntington Library and Gardens, Pasadena, California

Warning: this is not sewing related......

I work in Pasadena at Caltech as does one of my sisters (I have three).   About once a week, during our lunch hour,  she and I go over to Huntington Library and Gardens to wander around .  We like looking at the gardens and just being outside, however, today it was hot (and I was hungry and cranky and didn't really want to wander too much) so we went inside some of the gorgeous buildings to see some of the exhibits.  Here's some photos


I thought these light bulbs were interesting


 A view out one of the gallery windows
My sister and I


Friday, May 10, 2013

Mother of the Bride Dress Done


The Mother of the Bride dress is done!  (well, except for the hook and eye at the top of the back zip).


Pattern Description: Asymmetrical draped one-shoulder dress embroidered with colored beads or in my case bling/crystals. To be made out of velvet, crêpe or Jacquard fabric. This is the dress for the mother of the bride aka my sister in law. She is also walking her daughter/the bride down the aisle and I must say, I cannot wait to see my two dresses together!

Pattern Sizing: Sizes 42, 44, 46, and 48. I made size 46 which equates to about a size 8 in RTW "hips" and 14 in RTW "bust".

Did it look like the photo/drawing on the pattern envelope once you were done sewing with it? Yes. Yipee!

Were the instructions easy to follow? Instructions? There were no instructions. Only pattern. But the pattern was wonderful and the pieces fit perfectly. The entire process of this dress was 2 steps forward 1 step backwards. I'd do something, then realize I needed to do something else first, so had to rip out and re-do. For instance, I sewed the lining in before the zip and realized I needed to add the zip, at least before I sewed the lining to the neckline.   It really helps to think about several steps at a time and how they all will fit together. 


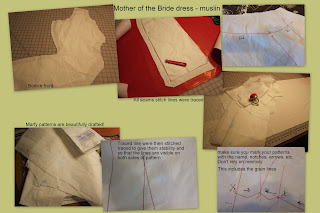
I first made a muslin and fitted it. I had to take a lot of fabric out of the bust as there was enough fabric for someone with at least a C cup. She was a large A/small B. I did this with 2 "dead" darts which are darts in the pattern, but not on the finished dress 


Below is the original pattern


You can see all the notations on the pattern. Match points to other areas are labeled alphabetically and there are notations where things are pleated or gathered. When making this bodice, I just followed those notations on the pattern, and it all came together perfectly and fit to the rest of the garment nicely.

Some pleats and gathers had to be omitted when I removed fabric with the "dead" darts.


Here's some construction details in making the muslin and marking the pattern.

What did you particularly like or dislike about the pattern? I loved that it is a narrow sheath dress, the one shoulder, and the bling option. I originally looked at this pattern for myself, but then thought, how nice the mother of the bride would look in this walking her daughter down the aisle. This dress will not overwhelm the bride's dress, but my sister in law will be stunning on her own too. They will compliment each other.


The most difficult part of the dress was the draped shoulder. (And I thought that would be easy)  Trying to figure out what was needed with only the picture and a couple of square shaped pattern pieces.  I decided not to underline or line the drape so that it would fall nicely. There was also a piece that I assumed was for the back which the front part of the upper shoulder drape was to fit to. Here's an inside bodice view.


 I did a lot of hand sewing on this dress and the drape and bodice to get it and the pleats just right. You can see some of my traced markings where I had to let the muslin out a bit. For this reason try to use tracing paper that is close to the color of your fabric, but still visible.  However, on the bridal gown I used white on white... which was only visible at a certain angle, but that's another story.

That reminds me, I did have to raise the armholes about 1" as they were low.

I put the zipper in by hand. I thought about a side zip versus a back zip and went with the back because I felt there was already too much going on on the sides. After basting in the zip I used a small back stitch/pick stitch with double waxed thread to sew in the center zip. I still need to put a hook and eye at the top. Because of the angle of the back, there was no way to get the zip all the way to the top. 


Fabric Used: I used silk jacquard for outer fabric; silk organza underlining, and china silk for the lining. I used the selvedge edge of the organza to stay the neckline.

Would you sew it again? Would you recommend it to others? I love this dress and would love to have an opportunity to make it for myself. If you fairly advanced this is a great dress. The dress itself is not too difficult and fairly basic, but the no instructions I feel makes it advance.

Conclusion: I am so happy with the way this dress turned out. 


Monday, May 6, 2013

Simplicity 1651


My dress to my niece's wedding is DONE! 

My review and all the details can be found here PatternReview